
Schematic diagram showing the major components system.
This is likely the most sophisticated and utilitarian residential rain water collection system in the state of New Mexico. It has been supplying 100% of the water needs of a family of 5 plus 3 horses for the past 5 years.
It was designed by an engineering firm in Santa Fe, NM and consists of eleven, 2500-gallon, underground potable water tanks for a total water storage of 27,500 gallons.
Water is collected on both the house and barn roof - for a total collection area of 5545 Sq. Ft. - down commercial grade heavy duty gutters and down spouts. It flows through 6" PVC pipes underground through a 70-gallon 'First Flush Filter' before entering the storage tanks. Snow breaks on the roofs prevent snow from sliding off so that it will melt into the collection system for year-round harvesting.
This web page will explain the system design, performance and delve into detail about the components that make it up. This will help the new owner understand the many great features of this amazing system.
Schematic diagram showing the major components system.
The first of the two following diagrams show the roof area calculations used to determine the total collection area. This diagram also shows the location of the downspouts associated with each collection area.
The second diagram shows the predicted amounts of water collected based on the area calculations for varying amounts of annual rainfall.
The perforamance over the past 5-years has been better than expected with the tanks being full most all of the time. Indeed, water flows from the overflows many times. This could be used for irrigation.
Roof water collection area calculations for each downspout.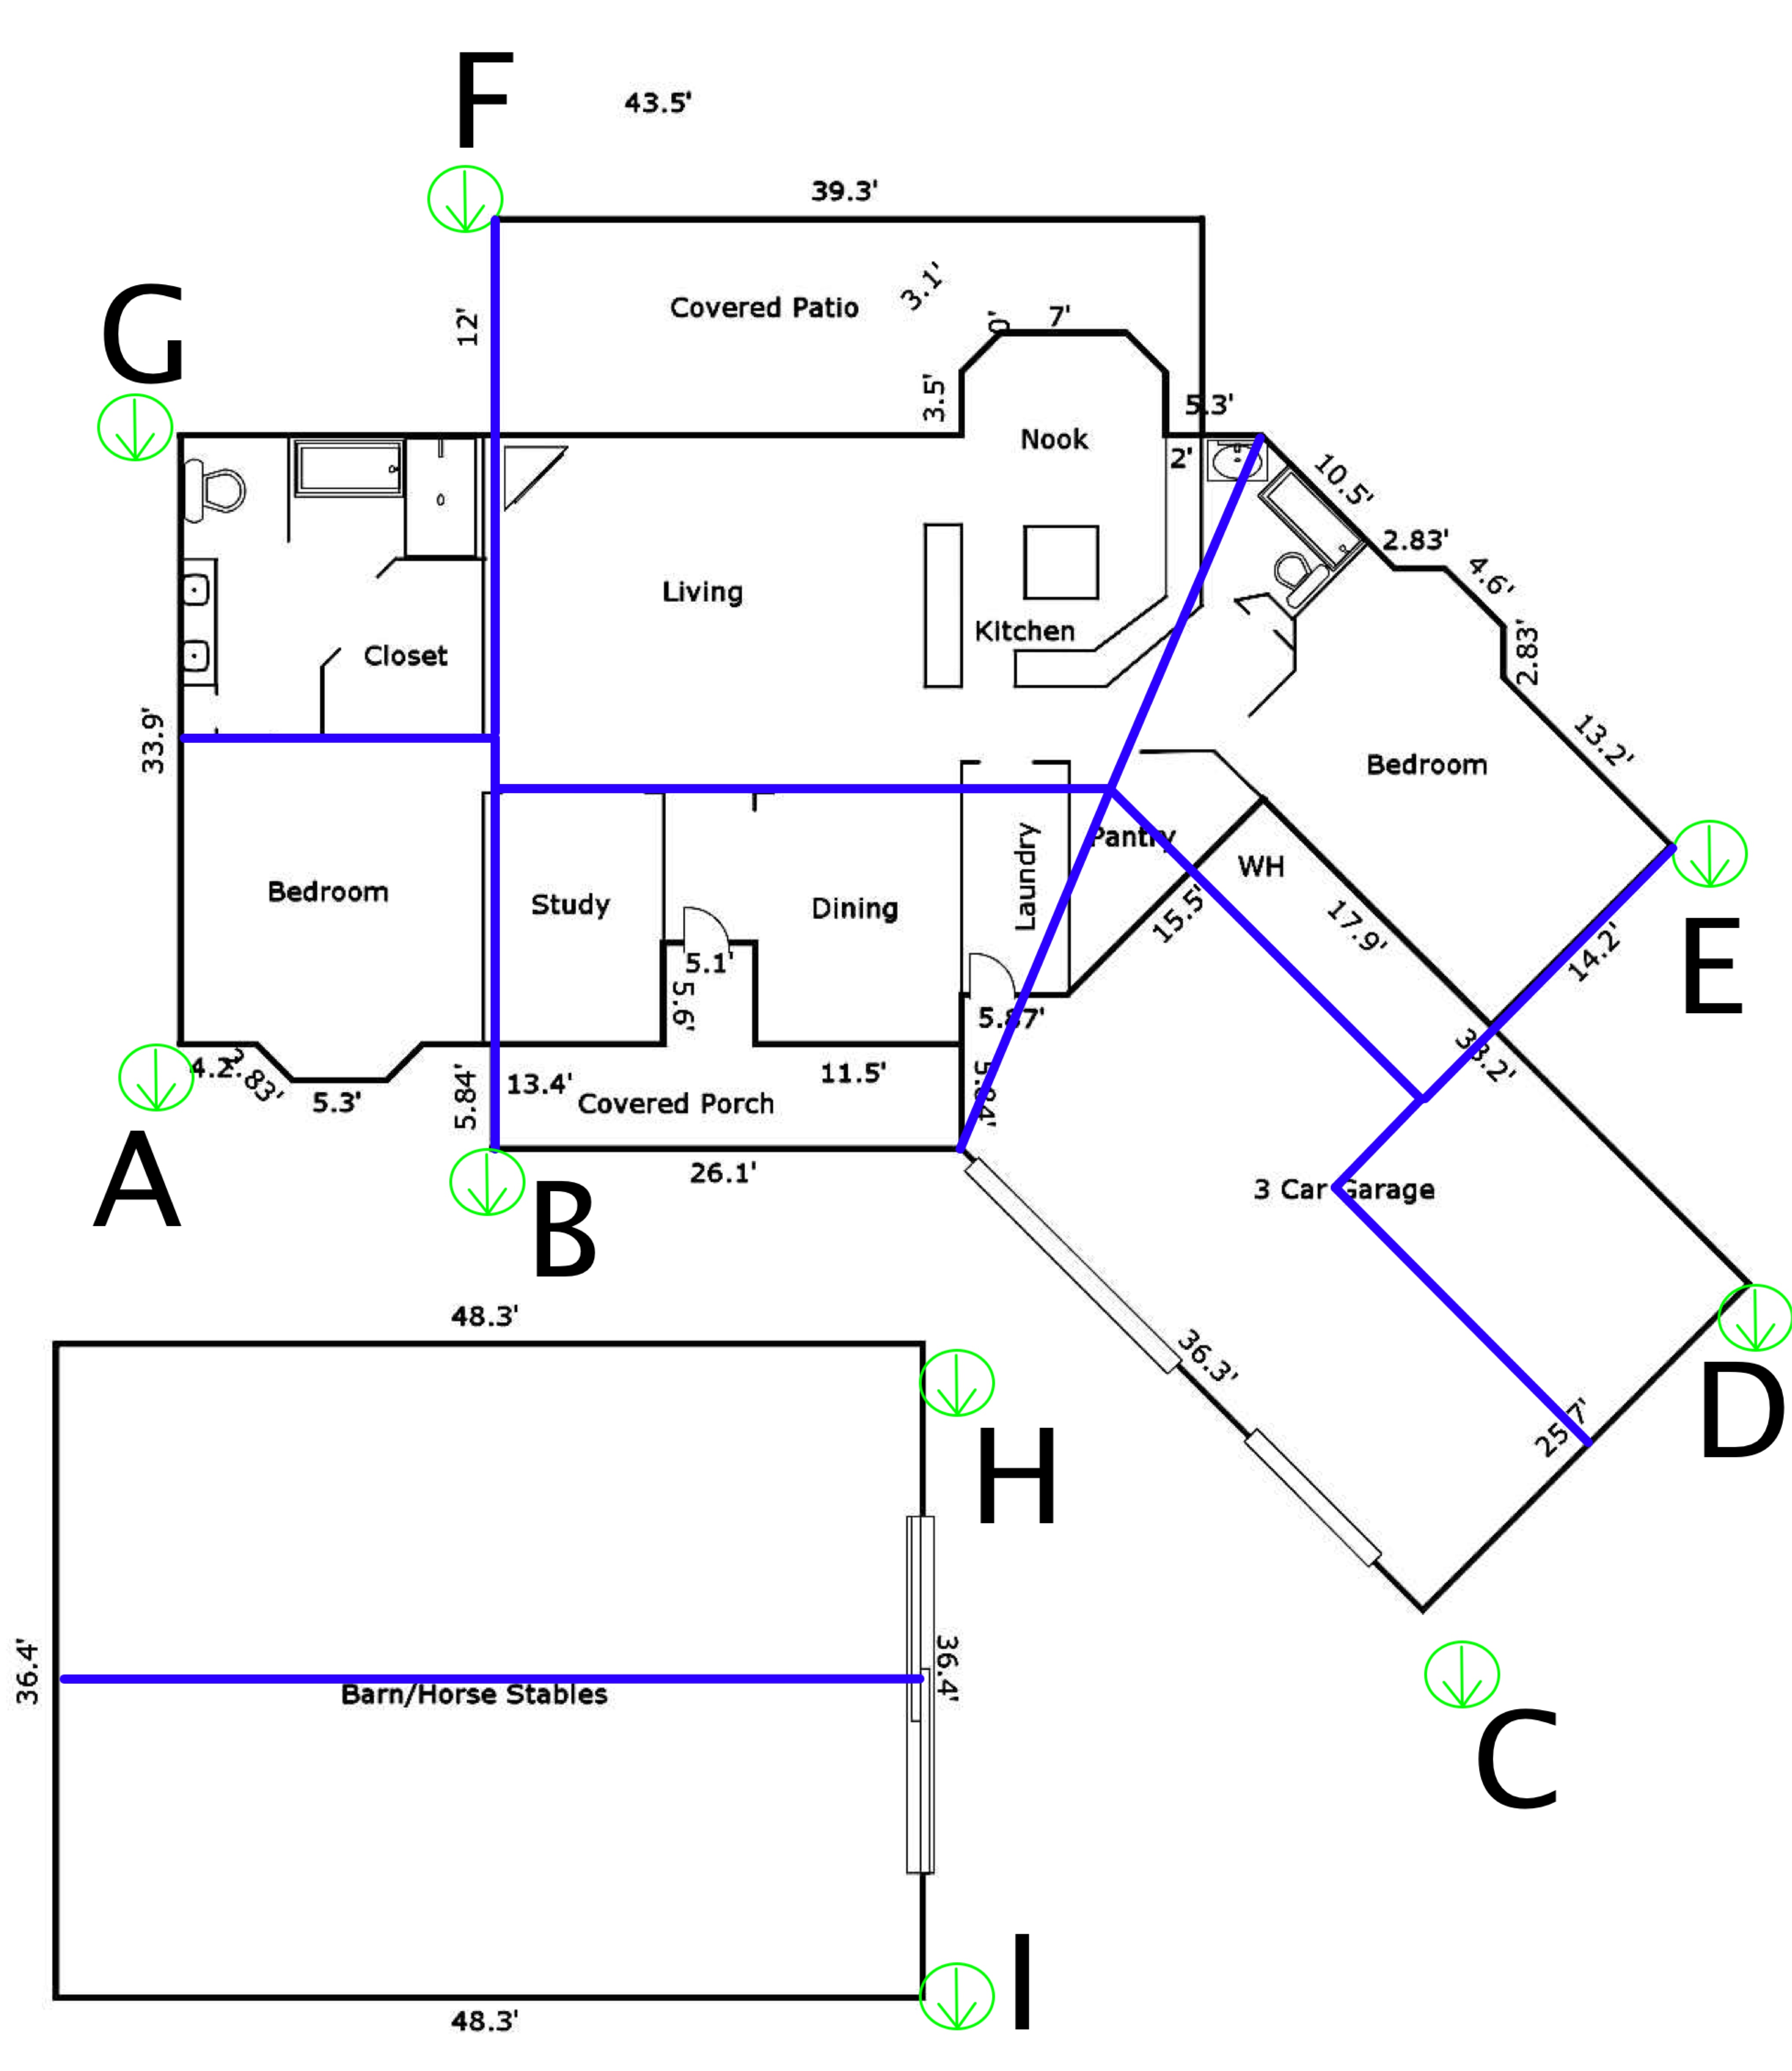
Water collection calculations for various amounts of annual rain.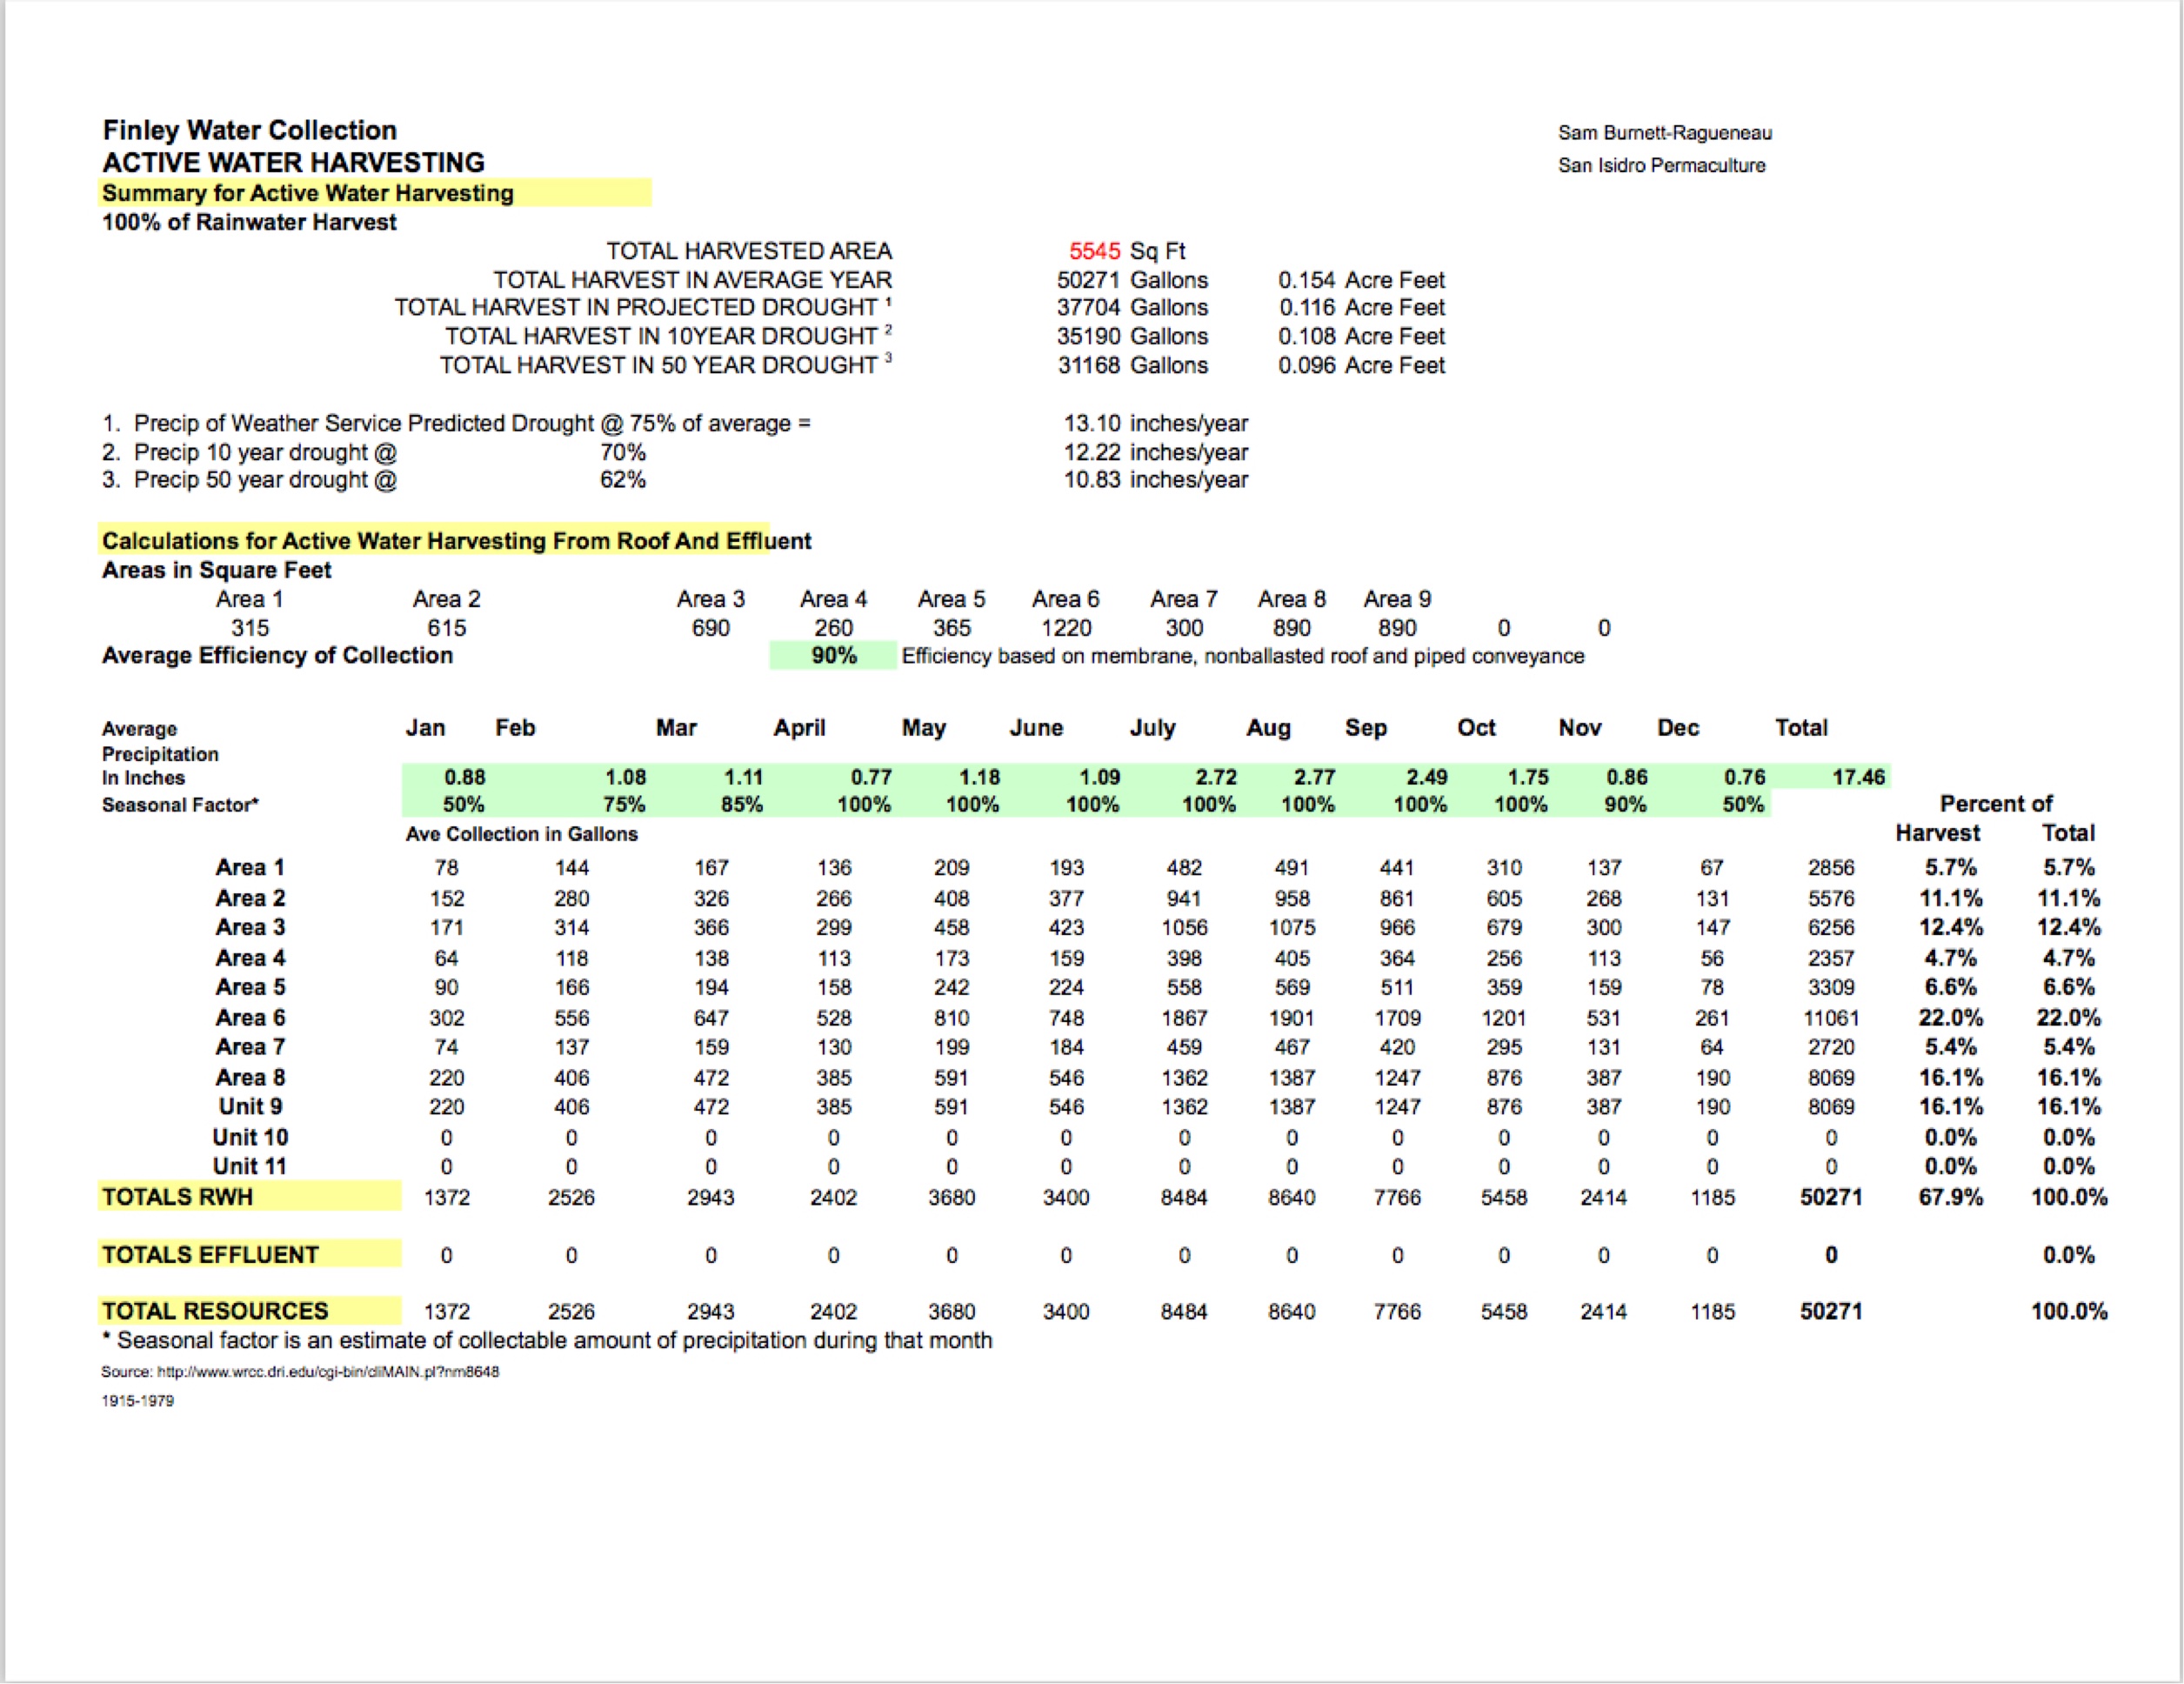
The heart of the system is the water storage area. Den Hartog Industries Aquifer Low Profile Cistern Tanks were used. There are eleven of them in the system each holding 2500 gallons.
The ACT2500-LPG Low Profile Cistern w/Ground Access Assembly was used.
The Ground Access Assembly is a riser tube that allows access to the buried tank.
It is large enough for a human to fit through - that is why they are kept locked.
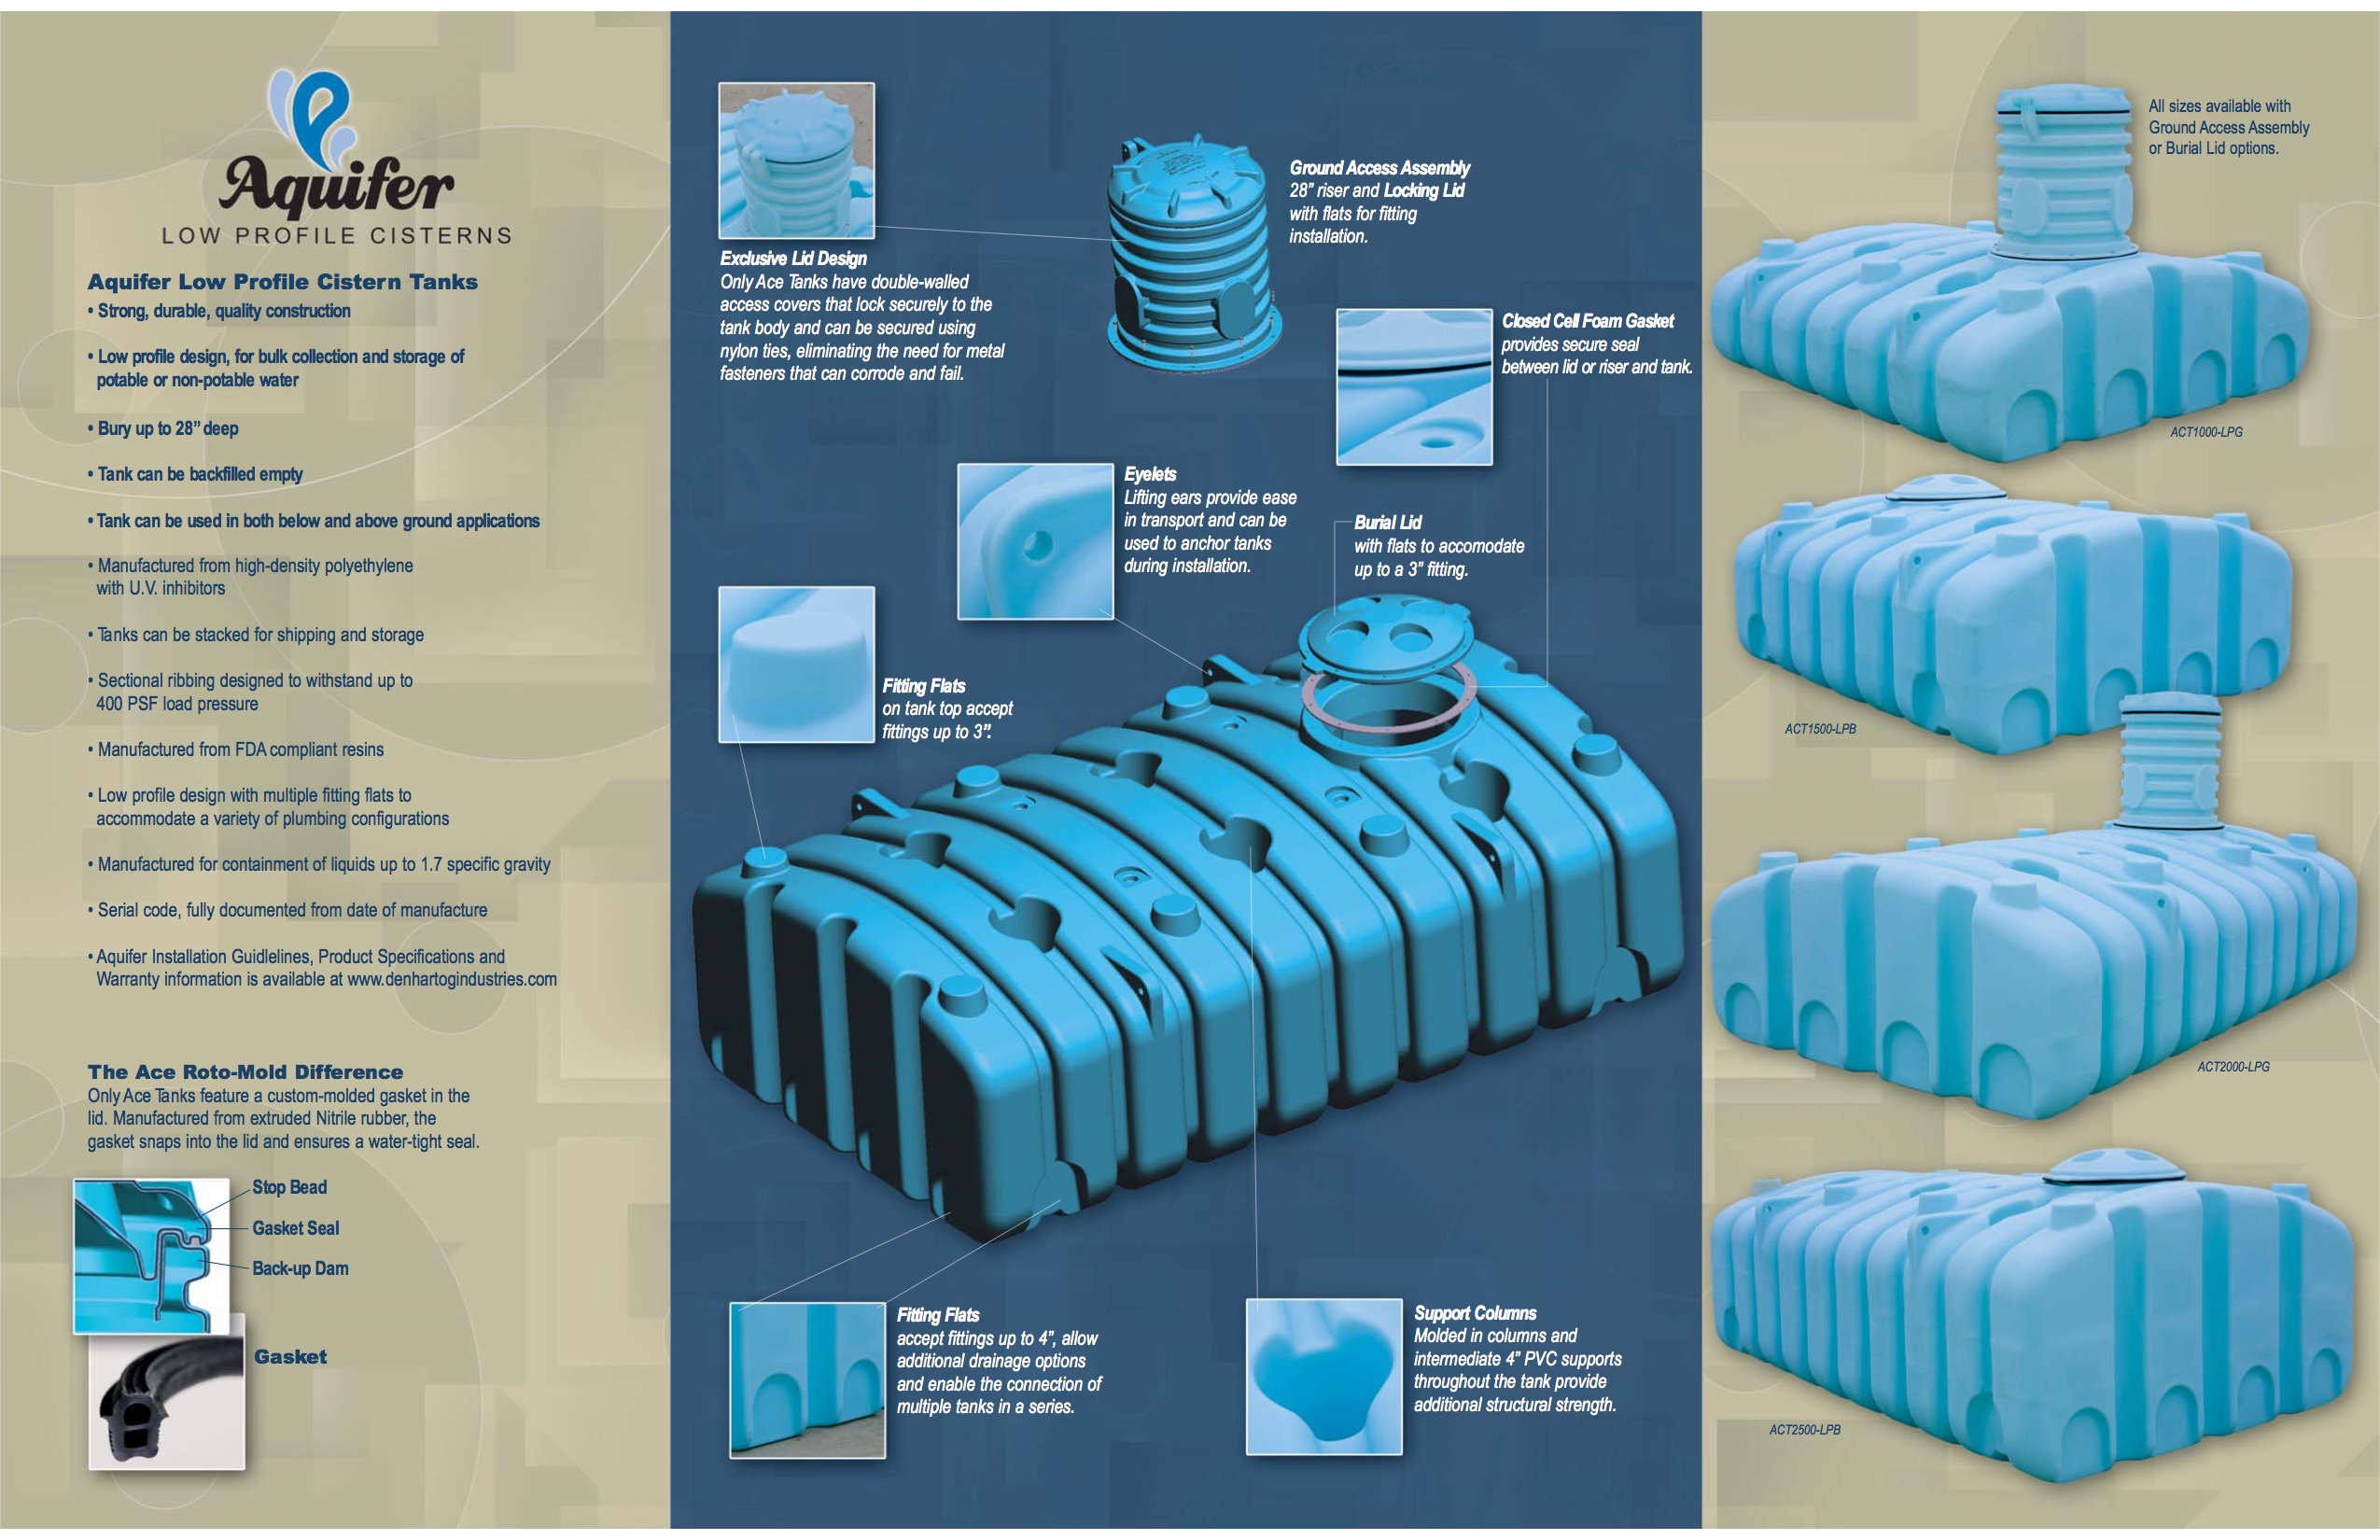
The ACT2500-LPG Specification.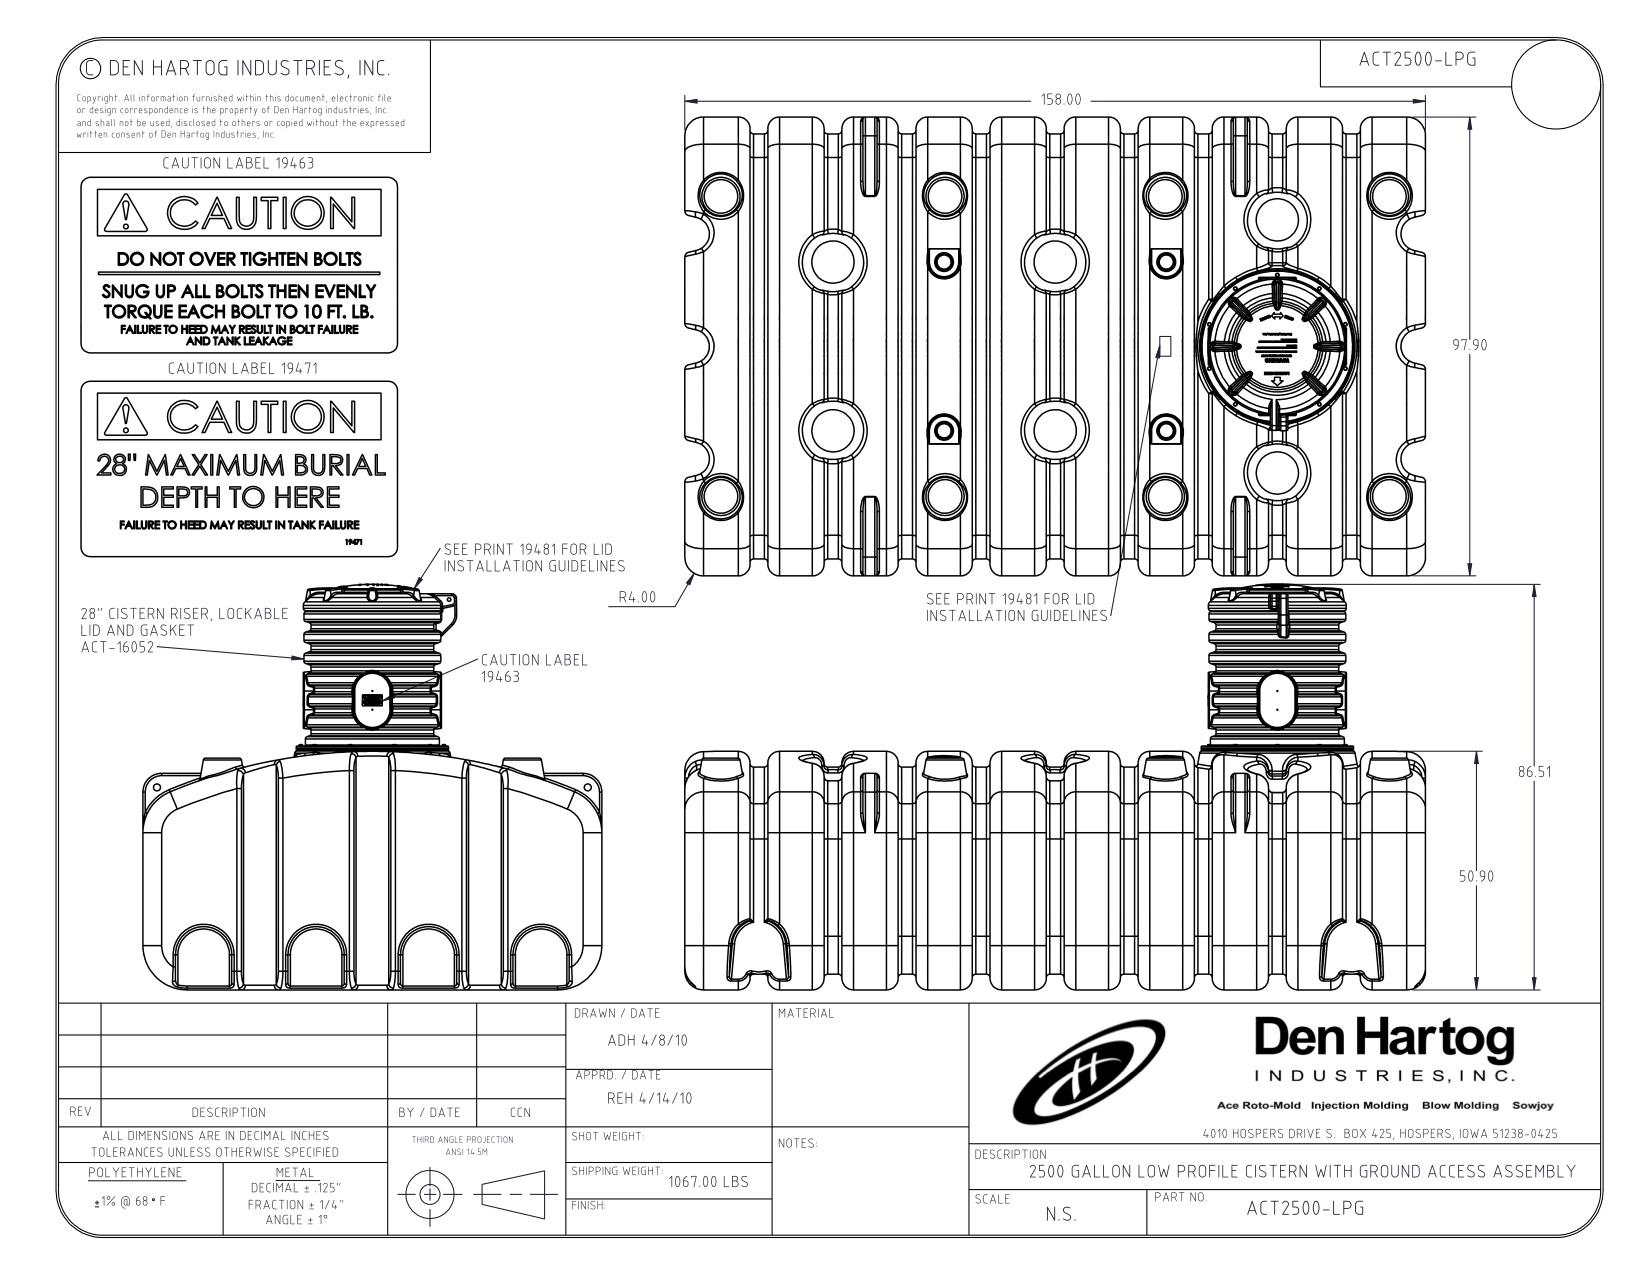
The tanks are laid out in two rows with 5 tanks in each row. The eleventh tank sits at the Northern end of the two rows (closest to the house). This is the Well/Truck Tank. All tanks can be isolated from the others. The well/truck tank has its own pump and was desiged to accept water from the well and/or a truck if necessary (which it has not been). The system is currently configured so all eleven tanks are connected together.
The tanks are numbered as shown here.
The tank numbering scheme. Number 11 is also fed by the well if desired.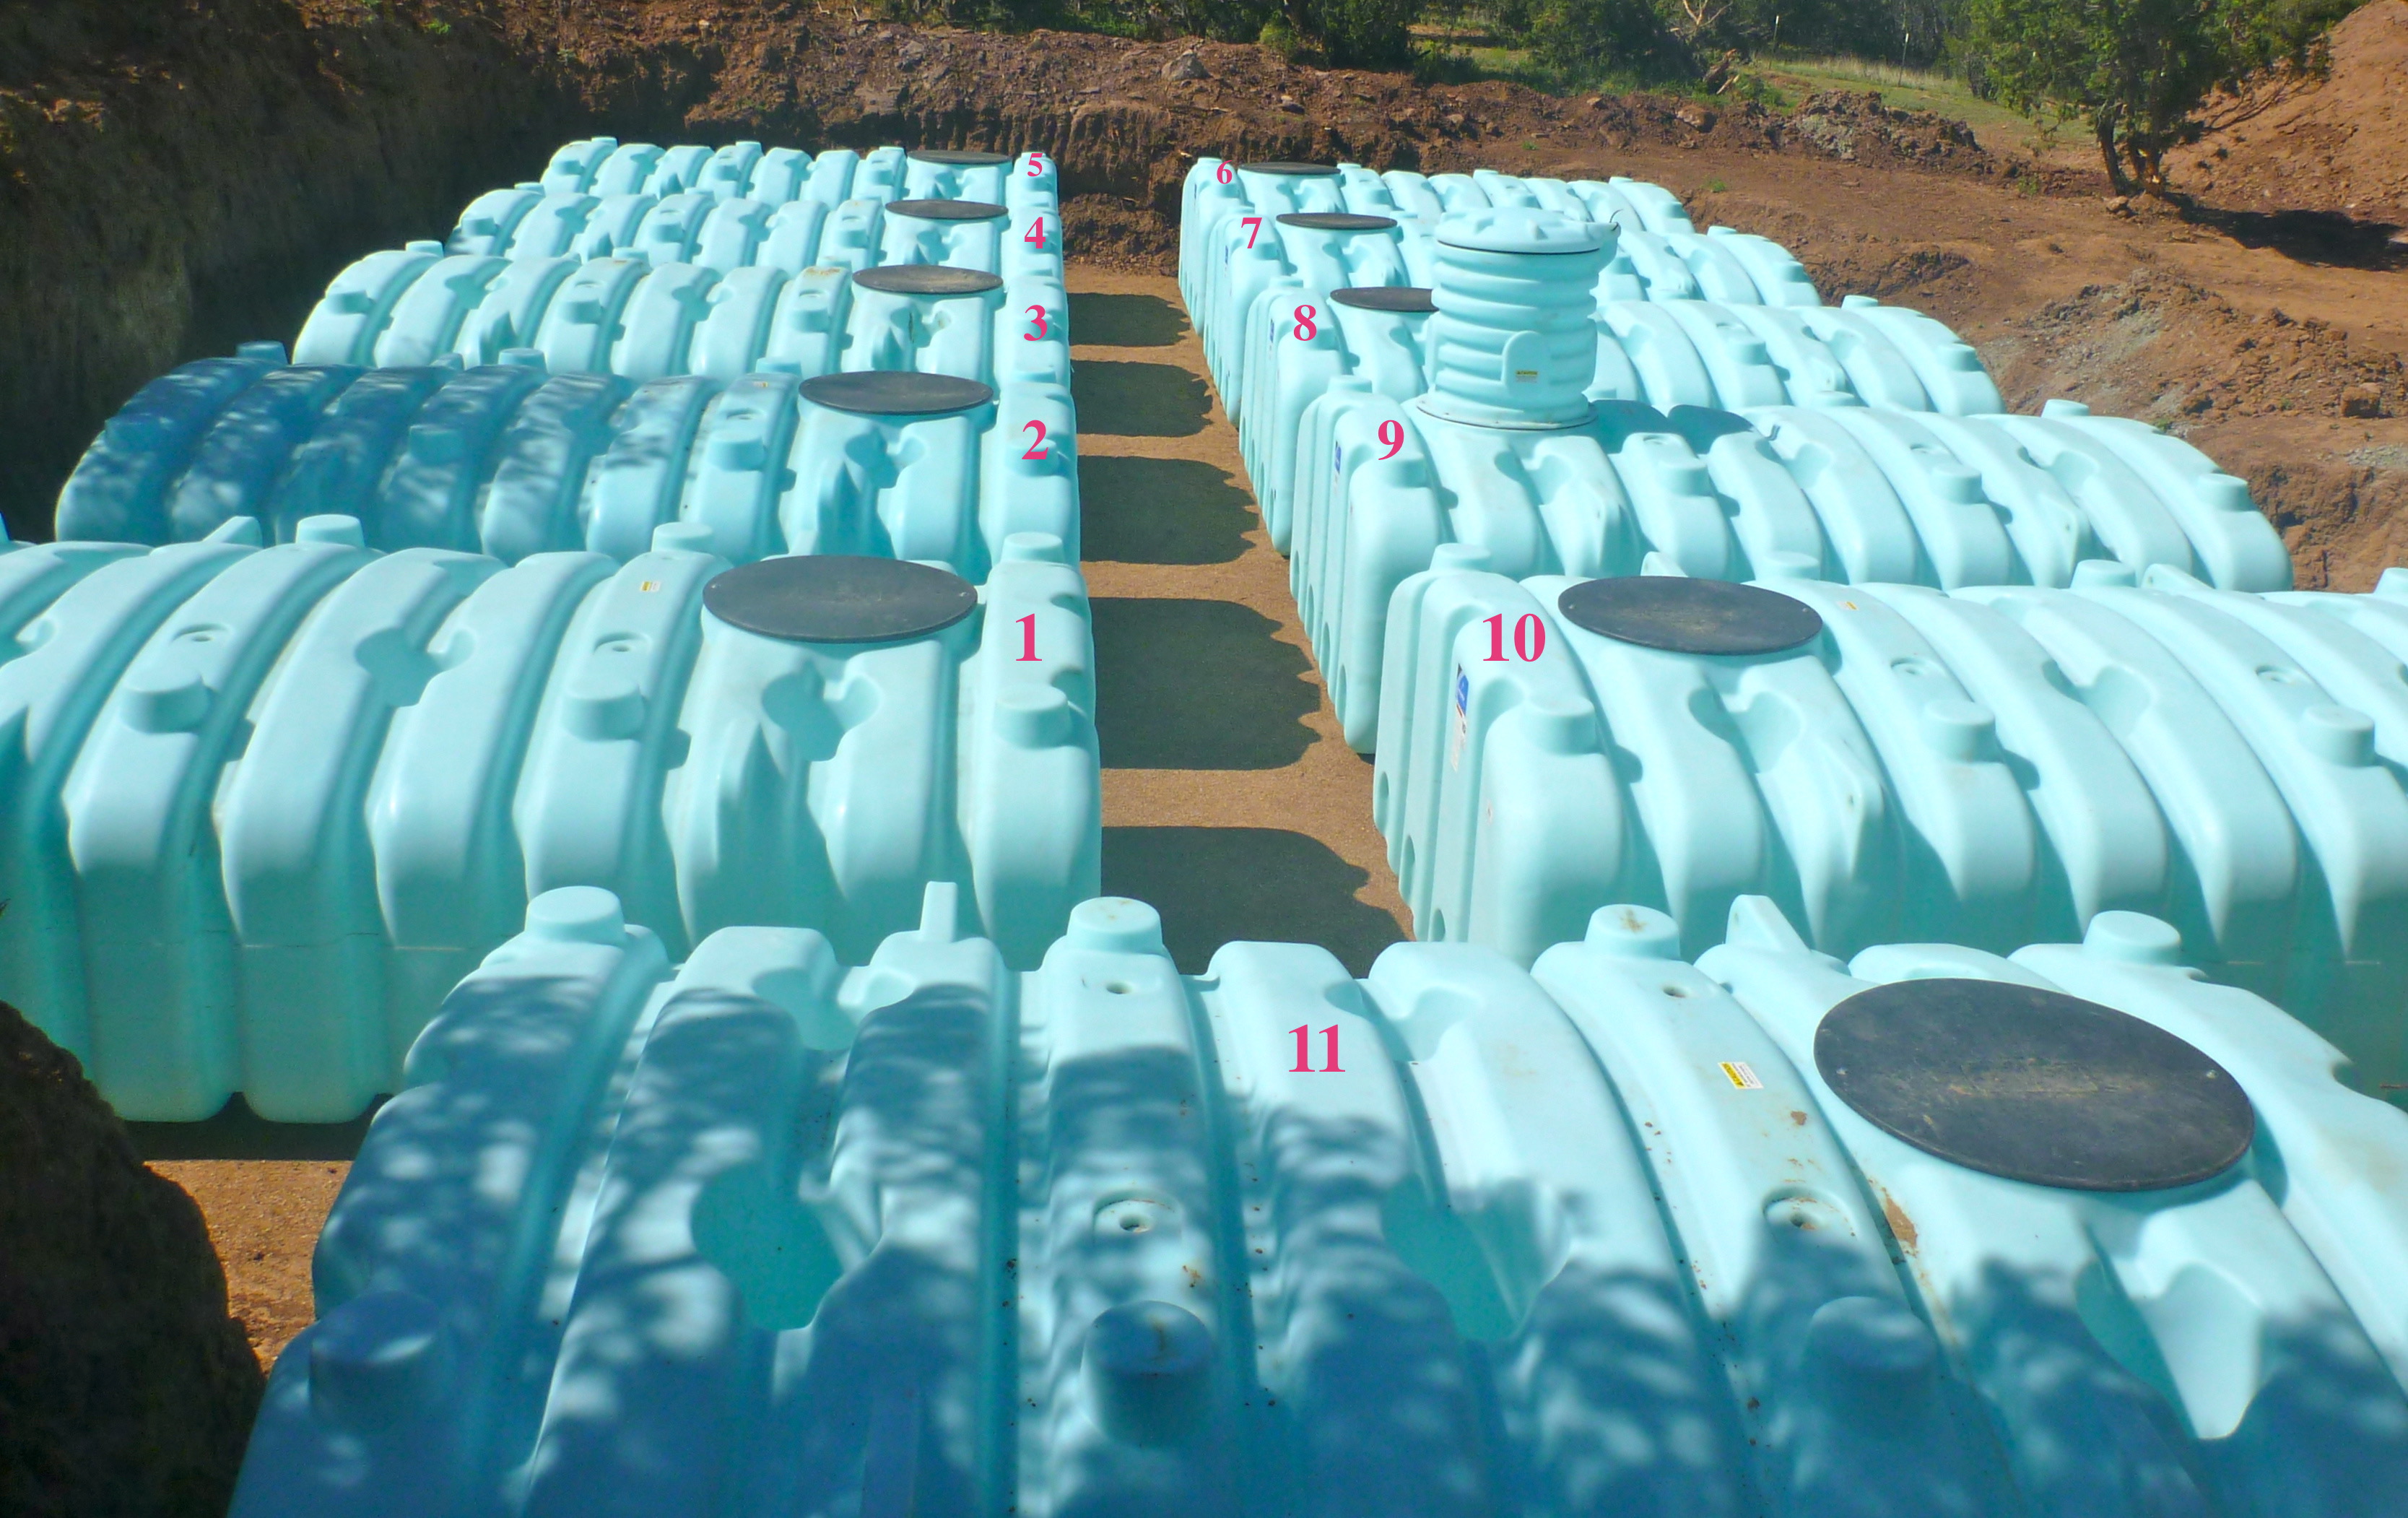
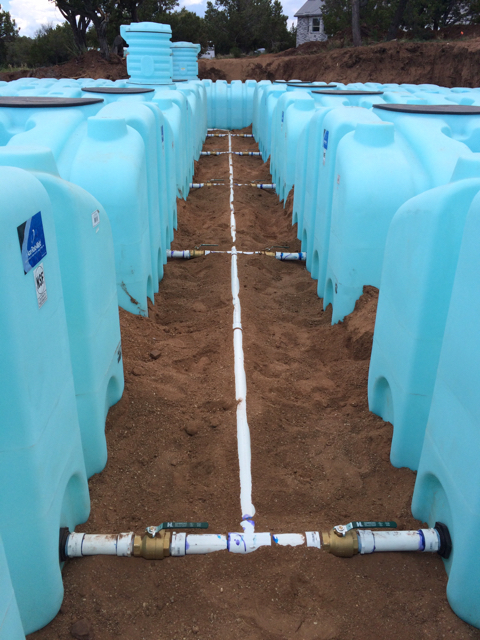
The tanks are interconnected by 2" PVC pipe so they behave as one large tank but
each tank can be individually isolated from the rest for cleaning or in case of a
failure.


Showing the overflow pipes
The following photo shows the tanks after they have been completely backfilled and painted to match the surroundings. The smaller pipes with caps on them (next to the large tank accesss covers) provide access to the isolation valve handles. A tool made from PVC pipe is used to turn the handle on the valve. This tool is located in the garage.
Completed tank burial and painting. The small pipes next to each access cover
provide access to the isolation valves - a long tool is used to open/shut the valve.
Commercial grade gutters and downspouts were installed by ABQ Gutter Pros of Albuquerque. Special 'gutter boots' adapt the square downspouts to the round 6" PVC tank feed pipes and look something like this:
Downspout Adapter
More specifically, the ones used in this system are Piedmont downspout adapters.
Most are 24" tall with a 4" offset.
Part # SO-45-24-S-S-6-4
4" X 5" 304 STAINLESS STEEL POWDER COATED OFFSET BOOT W/CLEAN-OUT AND 6" VERTICAL
OUTLET 26" TALL. (OFFSET can be from1 - 4-inches)
Purchased from RainStore-USA
Chris K. Keiger, PG Super helpful fellow.
RainStore-USA
5710 West Gate City Blvd.
Suite K, #269
Greensboro, NC 27407
(336) 918-5436
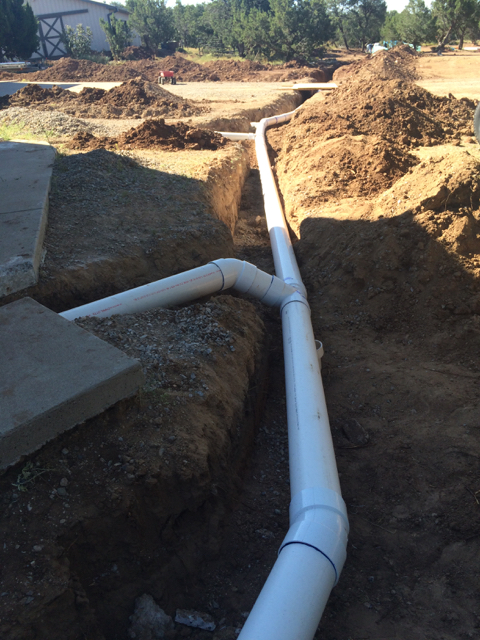
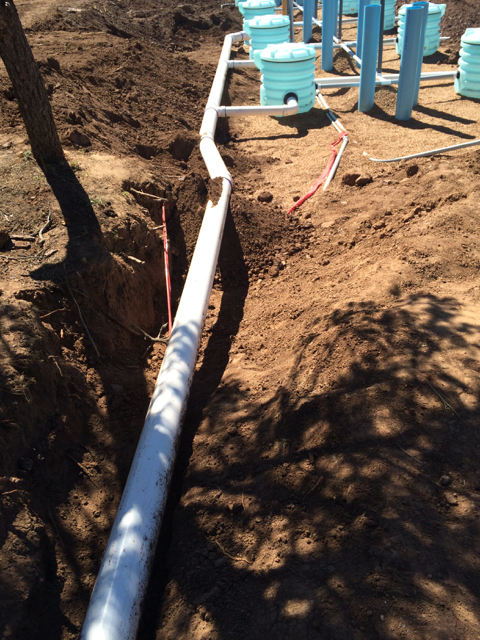
The main conveyence line for moving the water from the roof downspouts is 6" PVC pipe buried 24" underground running from the house and the barn to the tanks.
The line feeds into tanks 1, 2 and 3 as shown below.
This picture gives an idea of how large a 6" PVC pipe really is.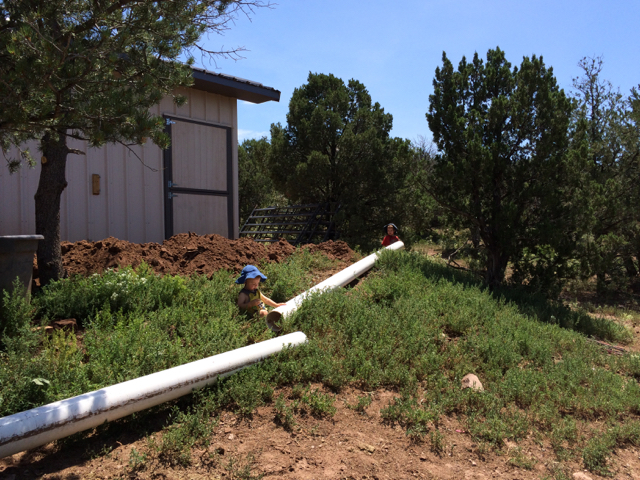
Between rain events, dust and whatnot will likely have gathered on the roofs. In order to prevent it from making it into the tanks, the first 70 gallons of water are diverted into what is called a 'First Flush Filter'. This water is not harvested but drains off into a gravel bed.
The only maintenance requirement for this filter is to, once per year, check for debris by removing the small cap at the far end of the filter. This is accessed via the green irrigation box between the house and the tanks. A float ball will likely roll out when the cap is removed; simply put it back in after removing any debris.
First Flush Filter Chamber
Finally the water arrives at the tanks. It feeds into tanks 1, 2 & 3. From those three tanks the water distributes itself to the other tanks via the 2" interconnection piping shown earlier.
The feed line flows into Tank-1, Tank-2 and Tank-3.
The system uses three 4-inch PVC pipes connected to tanks 1, 2 and 3 which are the three tanks that are connected to the feed line. The pipes are shown below as the three heading down the slope.
The three white pipes heading down the slope are for overflow.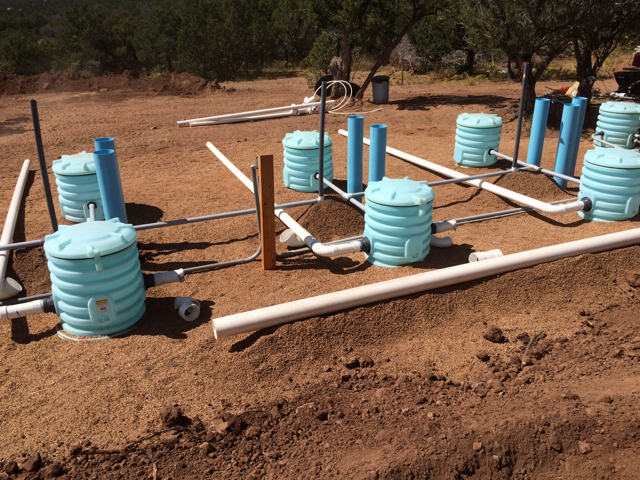
The overflow pipes are capped with Mosquito Tank Flap Valves to prevent critters from getting into the system via the overflow piping.
Critters are kept out of the overflow system with these Mosquito Tank Flap Valves.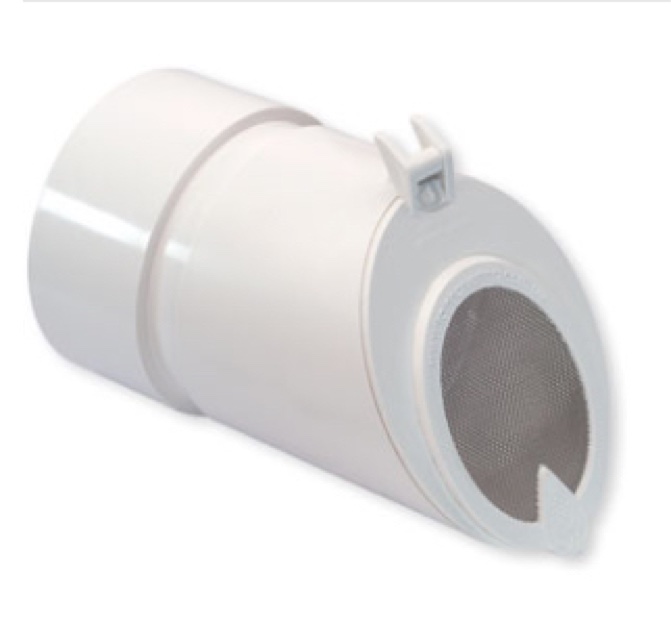
The 10 main tanks are tied together for venting purposed using 2-inch Schedule 80 PVC.
Three snorkel pipes rise above the ground. The venting pipes are the gray ones in this
photo.
The three white pipes heading down the slope are for overflow.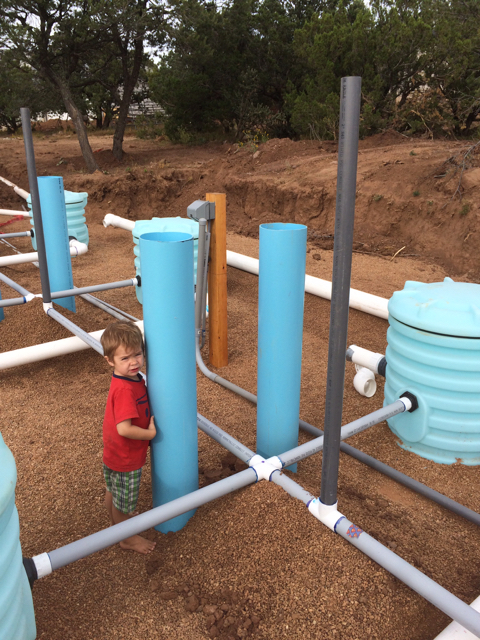
The vent pipe snorkels are capped with Stainless steel screened vent caps to prevent critters from getting into the system via the venting system.
These caps have a stainless steel screen to keep mosquitos, etc. out of the system.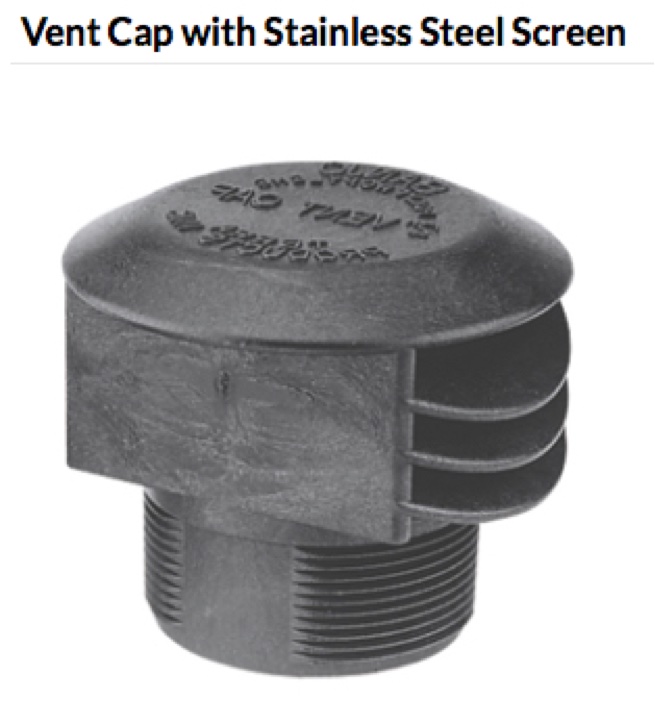
Now that the water is in the tanks, we have to get it back to the house. The water is pumped to the house via PEX piping. PEX piping is also used to connect the well output to the Truck/Well tank (#11) as shown here.
PEX Piping is used to move water from the tanks back to the house.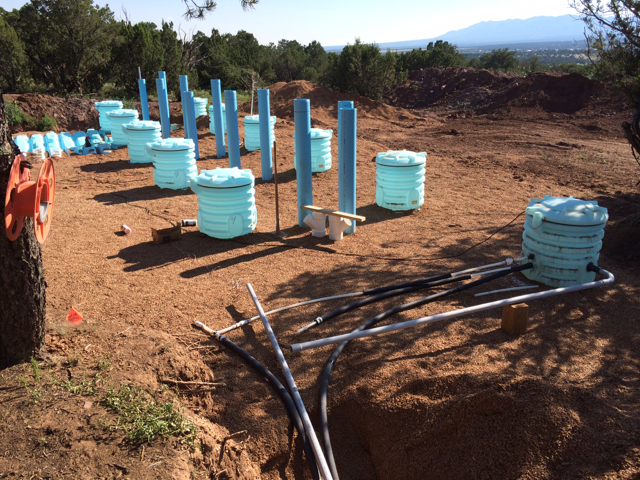
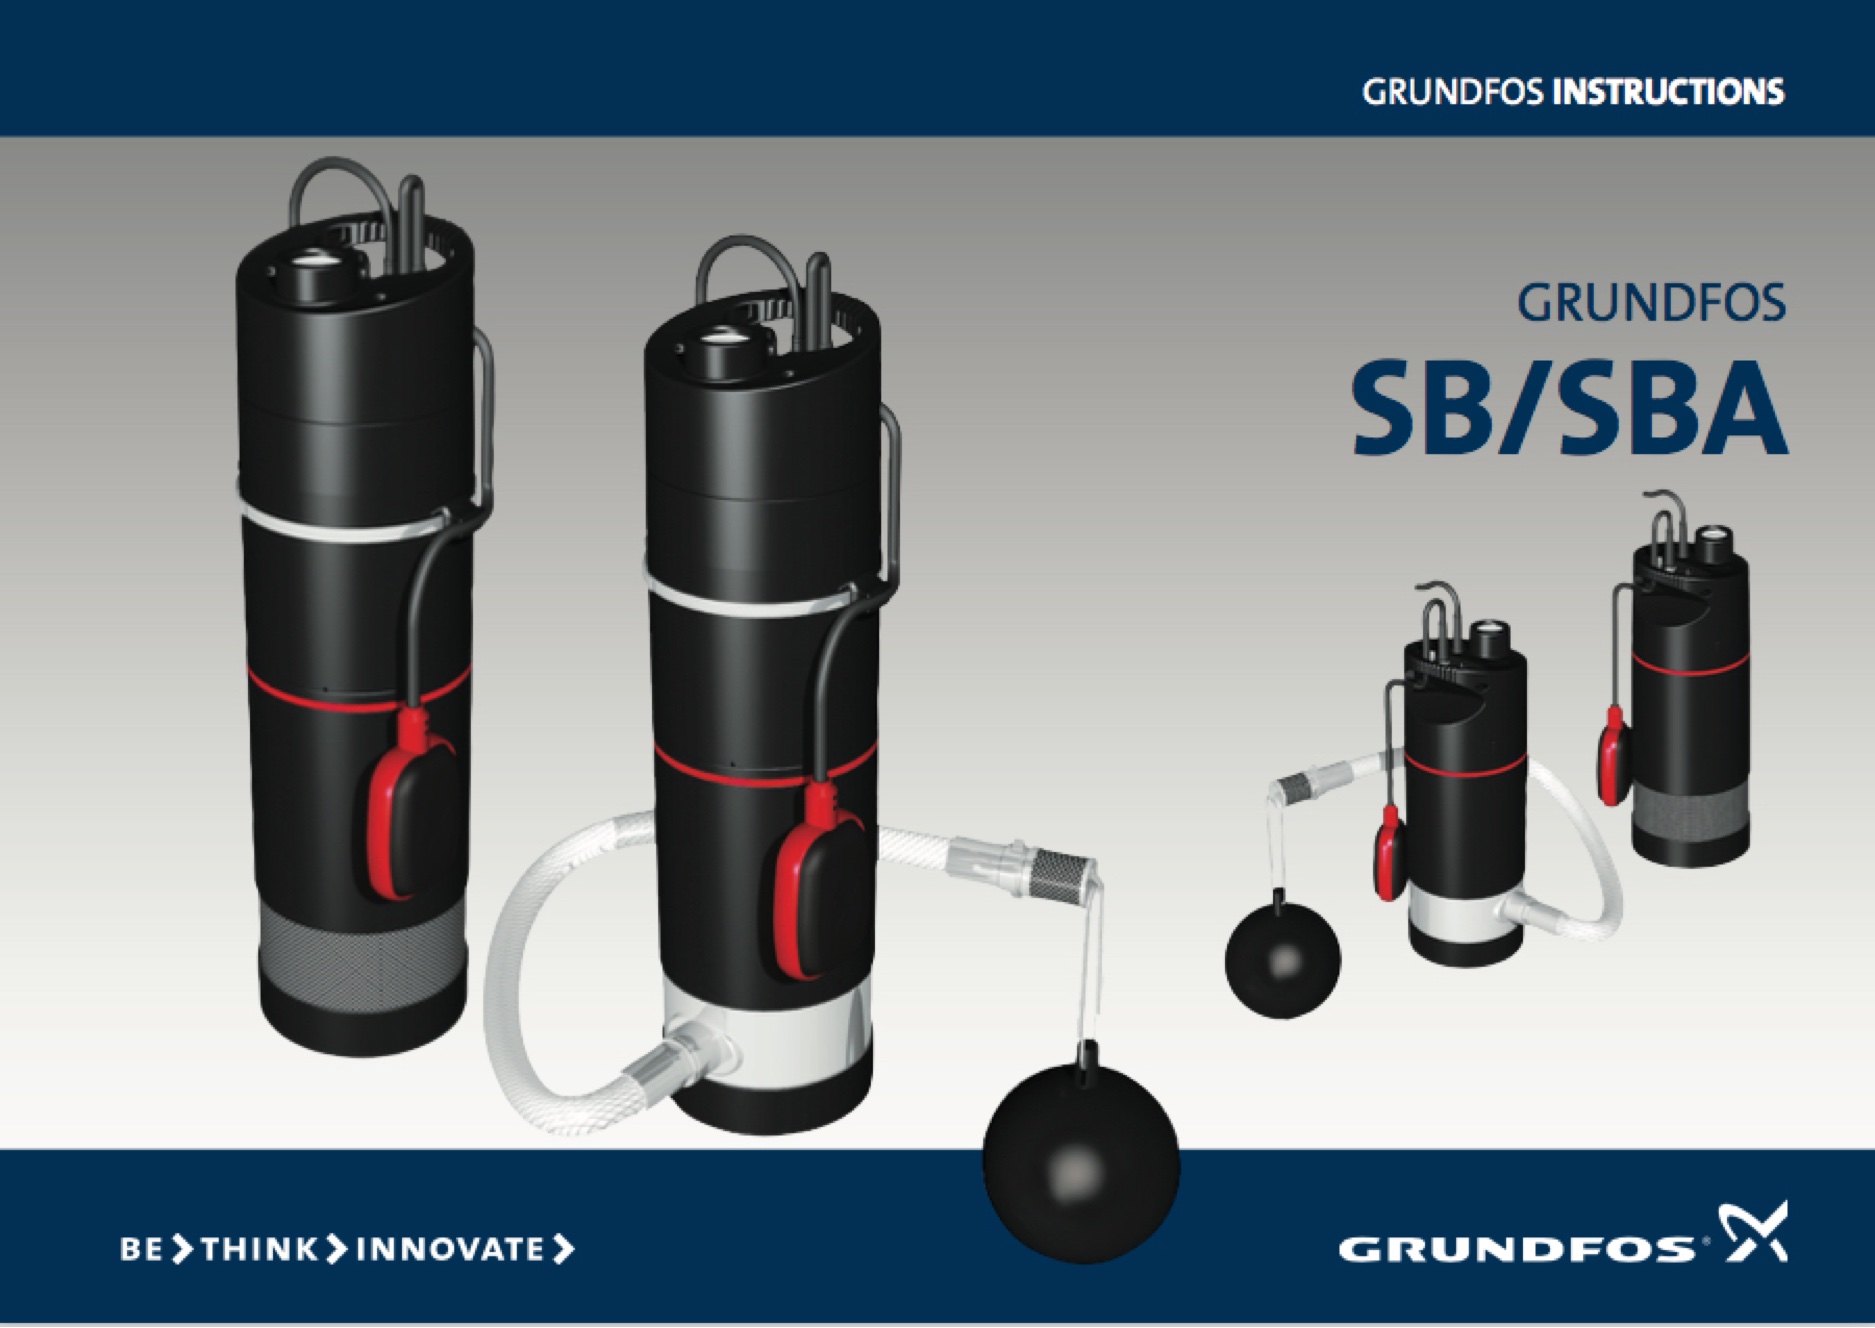
The system has two pumps, one located in Tank-11 (truck/well tank) and one located in Tank-5. Having two pumps provides redundancy; if one fails the other can easily be switched into service by the 3-way Pump Selection Switch located in the garage.
German made Grundfos SBA-3-45-AW Automatic Pump with Floating Extractor are used. The floating extractor keeps the pickup nearer to the water surface where it is cleaner.
Grundfos Performance Specification
The second one from the left is the one used in this installation.
The pumps are of the submersable type and simply sit at the bottom of the tank as seen here.
Pump sitting at the bottom of the tank.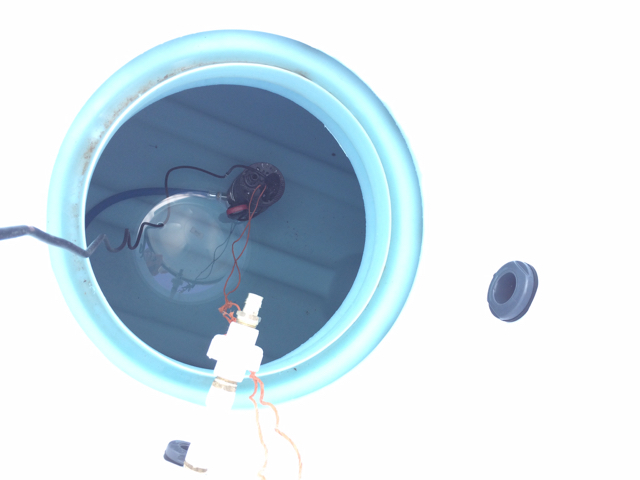
The pumps are plumbed into the return lines using couplers so that they can be easily removed from the tank and moved to another or for servicing. The following shows the pump plumbed into the Truck/Well tank. The water that is seen flowing into this tank is coming from the well.
Truck/Well tank pump plumbing.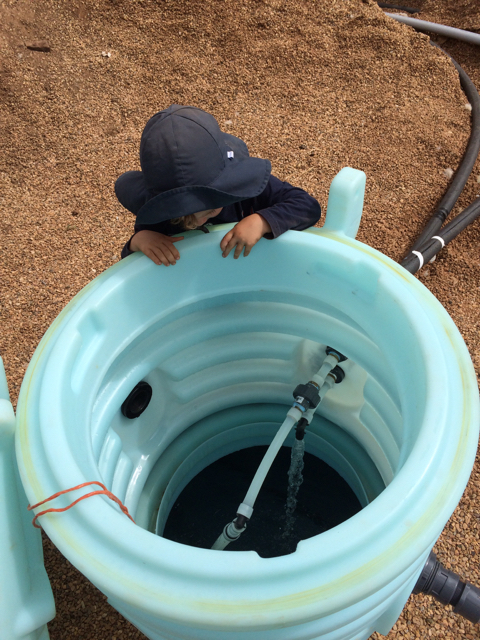
Once the water reaches the house but before going into the pressure tank, it is filtered. There are four stages to the filtration system as seen the photo.
Four stages of filtration: 1) Spin Down, 2) sediment, 3) carbon, 4) UV.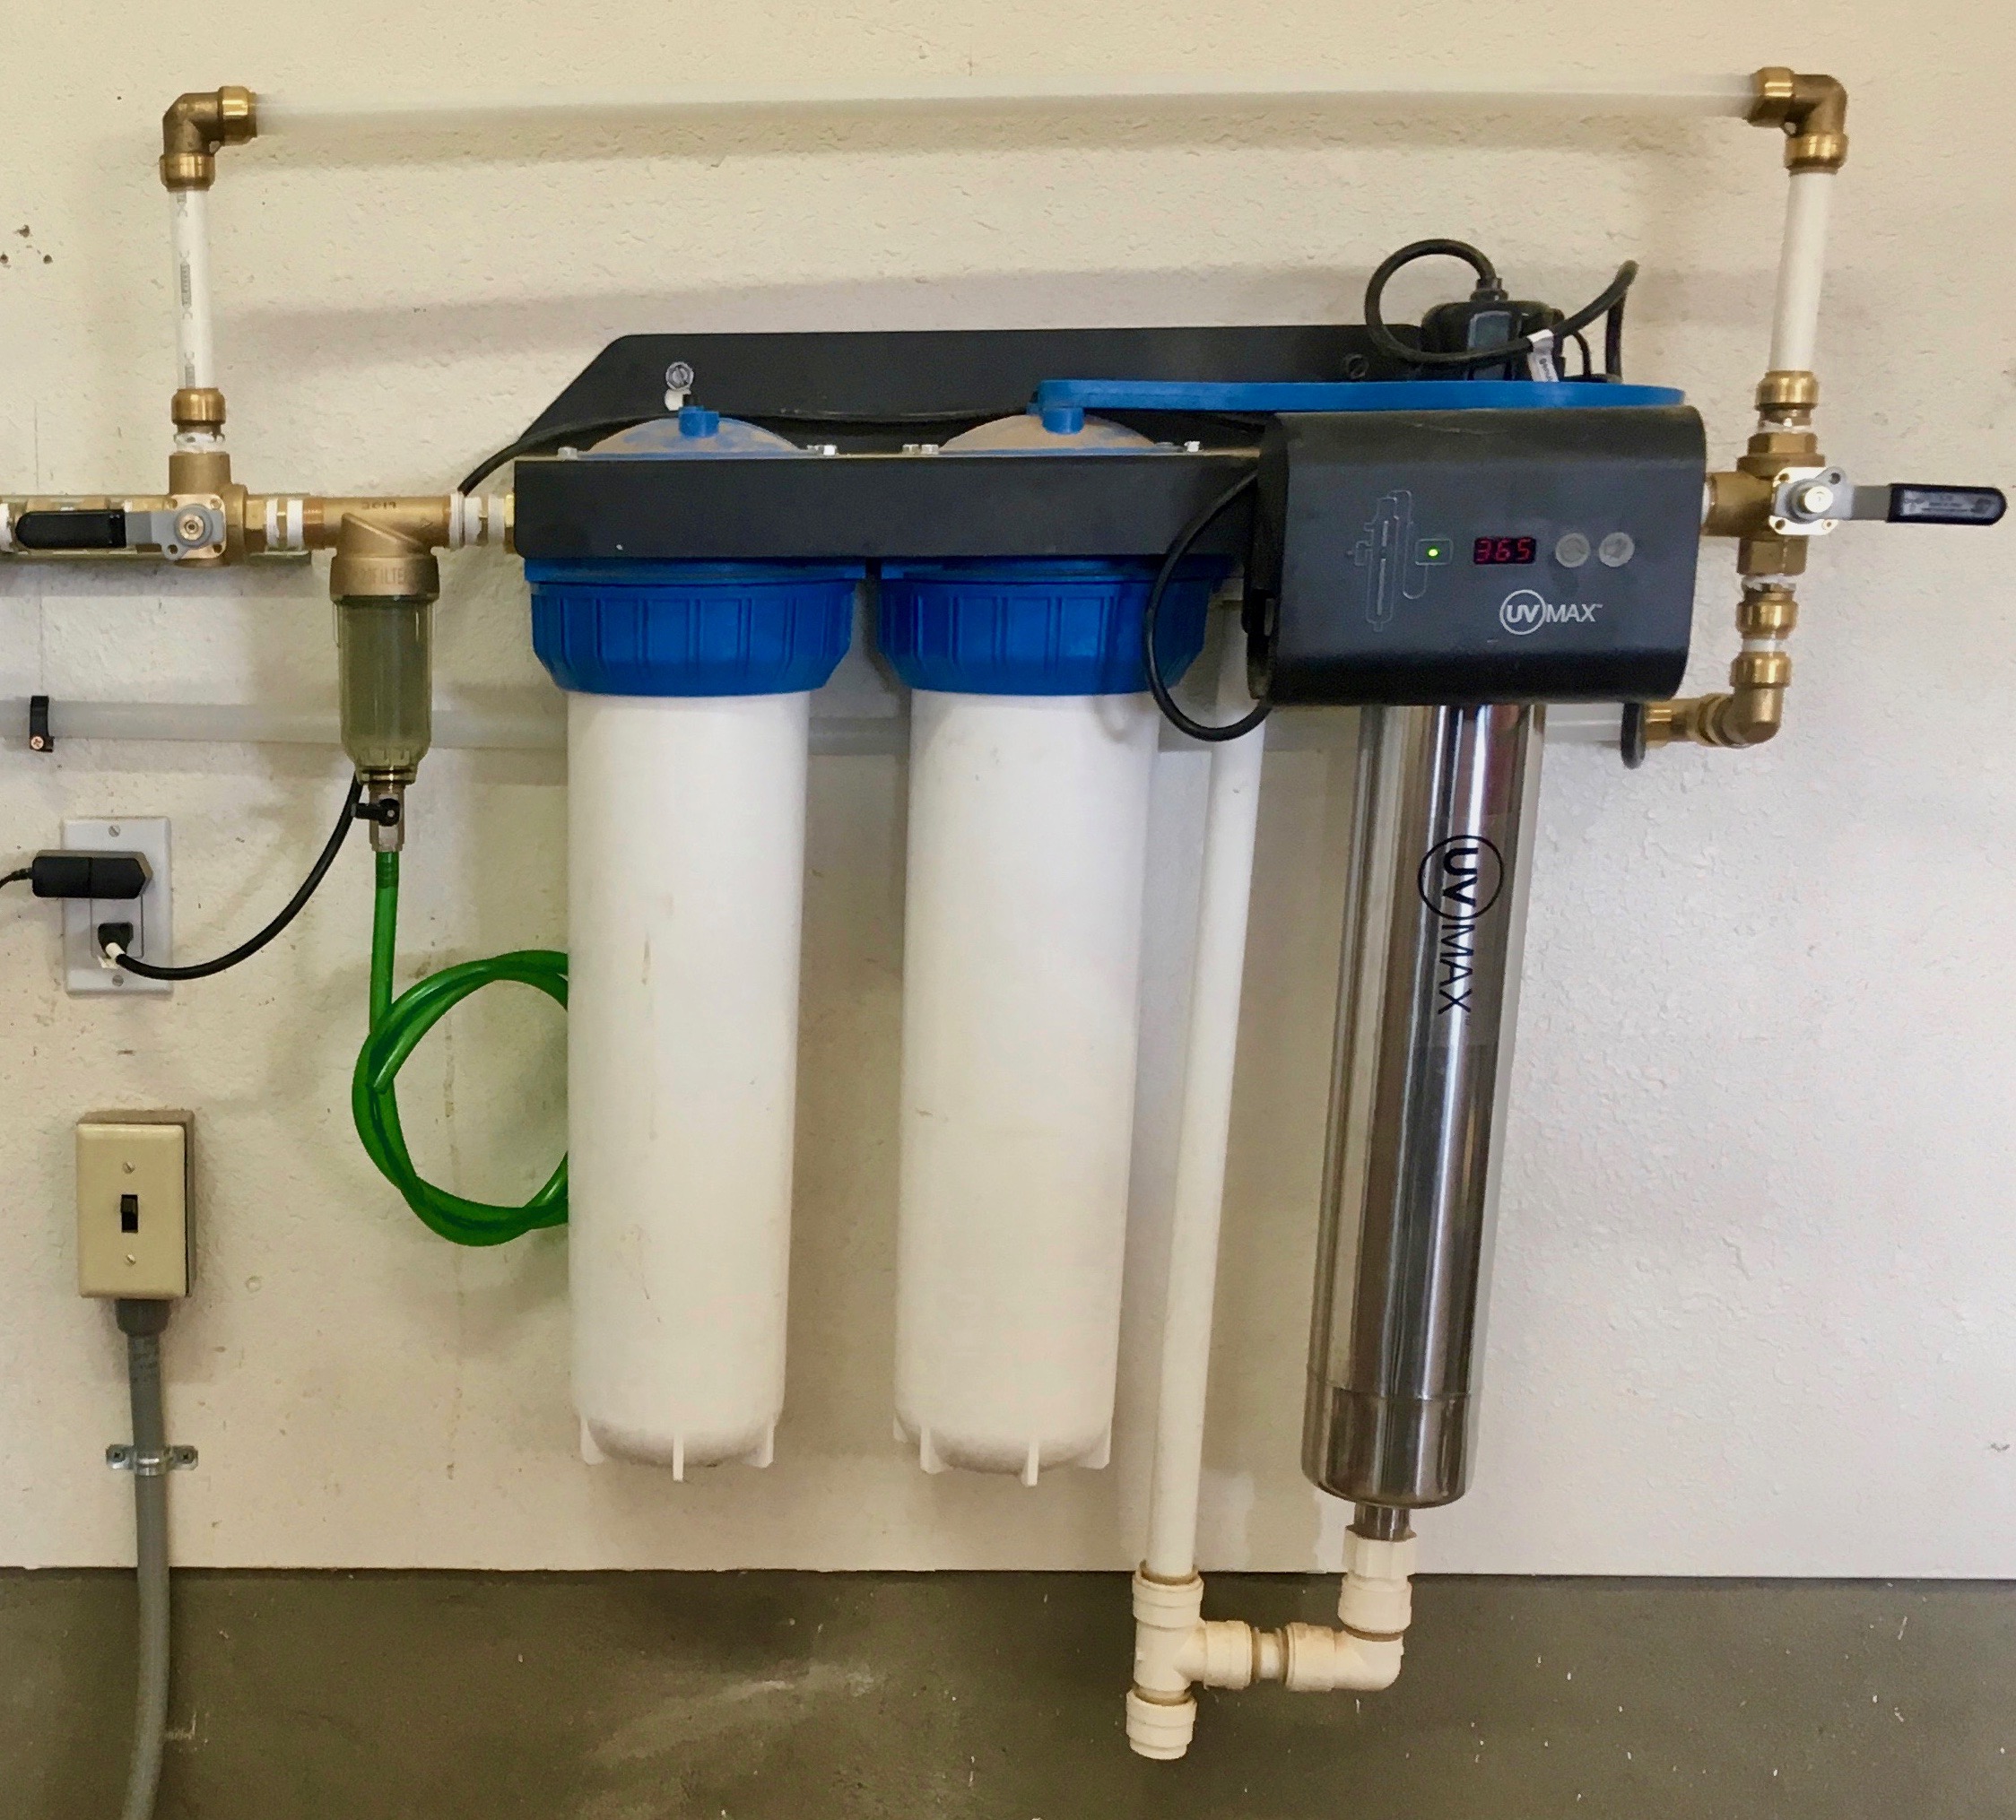
The first filter (on the left) is an ISPRING Reusable Sediment Water Filter Spin Down Sand Separator that filters at 100-microns. This filter catches the bigger particles and is easily flushed by simply opening the valve at the bottom with the green hose in a bucket. No filter change is required.
The next part of the system is the
Viqua IHS22-E4 assembly.
The Viqua IHS22E4 consists of three filter
chambers as follows:
The first (left most of the assembly) is a sediment filter that filters down to 5 microns. The replacement for this is: Sediment Filter Replacement Cartridge
The next filter to the right (in the middle of the assembly) is a 10 micron carbon block filter. The replacement cartridge for it is: Carbon/Lead Filter Replacement Cartridge
Finally the right most filter in the assembly is a 70-watt ultraviolet lamp filter that renders micro-organisms harmless when they pass through the UV rays. The replacement lamp is found here: UV Filter Replacement Cartridge
Besides the First Flush Filter, this is the only part of the system that requires regular maintenance. The filters should be replaced once a year. The UV filter has an LED count down display that is reset to 365 when the filter is changed. It will alert when the year has passed.
To facilitate filter changing, the filters can be isolated turning the two three-way valves to the UP position. This effectively diverts the water flow around the filters.
This water system has two protection systems to safeguard against undesired continuous water flow such as the case of a burst pipe or an outside hydrant inadvertantly being left open.
The Water Hero System

The Water Hero is essentially a 'smart valve'
installed inline of the main water supply after the pressure tank. It monitors
the flow of water down to 1/100 of a gallon and can be configured to automatically shut
off when it detects water flowing constantly for a set amount of time.
It has 'away' and 'home' modes for easily switching between two configurations. It is
remotely accessible via the Internet so water usage can be monitored and controlled
even when away from home.
There are three components of the Water Hero system:
As an extra failsafe, and to help protect in the event that there is a burst pipe BEFORE the pressure tank, the Grundfos Pressure Manager 2 is part of the system's failsafe equipment.
The Grundfos Pressure Manager 2 (PM2)
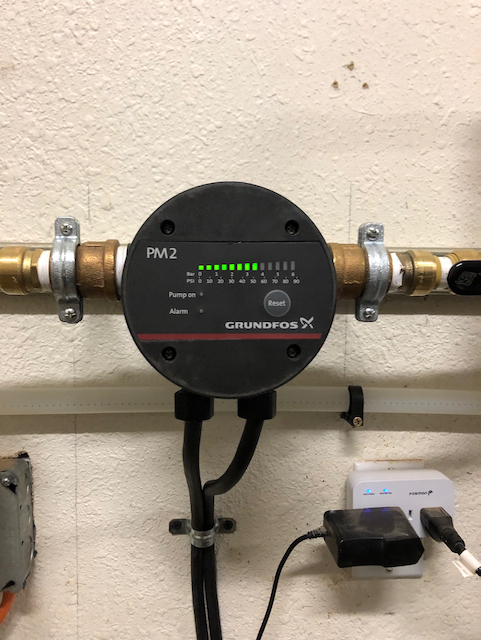
The PM2 is an industry grade device that replaces the main pressure tank's pressure
switch. Pump operation is controlled by the PM2. When it senses a pre-programmed
drop in pressure - such as a faucet being opened - it turns the pump on and keeps it
running as long as water is flowing for up to 30-minutes.
The 30-minute shutoff timer is a safety feature to keep the water from running in
the case of a fractured pipe or hydrant being inadvertantly left on.
In this manner, the PM2 is a second line of defense should the Water Hero fail to
turn off the water flow after its preconfigured timeout.
The PM2 also provides pump dry-running protection.
The PM2 actually has its own pressure tank built into to prevent too-frequent pump cycling. But since the system also kept in place the main water pressure tank this feature is a redundancy.
The front panel of the PM2 has a handy indicator that shows when the pump is running. It also shows the water pressure with the green LED light bar.
The final component of the system is the pump selection switch.
The Pump Selection Control Panel
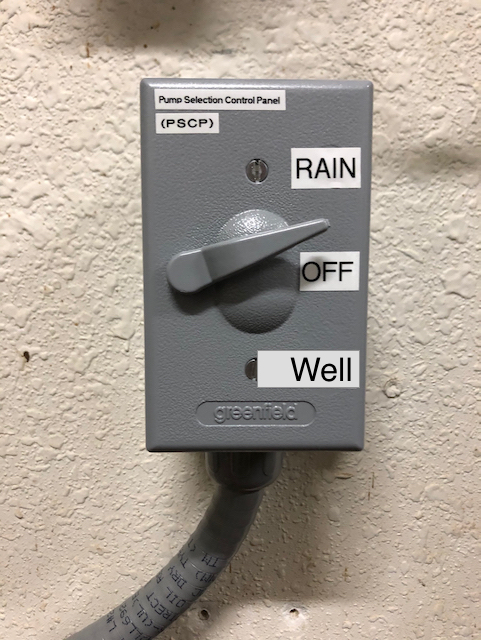
This is a Hubble brand 3-way switch that allows selection of either the Truck/Well tank
pump or the main rain water tanks pump or neither.
When on vacation, it is a good idea to set this to the 'Off' position to ensure that the
pumps will not come on even if a pipe bursts
Tank number 11 was designed to be entirely stand-alone. In the unusual event that someone would prefer to haul water rather than collect it, it is advisable to to isolate tank 11, switch the Pump Selection Switch to the "Well" position, and have the water hauler dump 2500 gallons in to that tank.